Serverless Jenkins Pipelines with Google Cloud Run

jenkins-google-cloud-run

Jenkinsfile-Runner-Google-Cloud-Run project is a Google Cloud Run (a container native, serverless platform) Docker image to run Jenkins pipelines. It will process a GitHub webhook, git clone the repository and execute the Jenkinsfile in that git repository. It allows high scalability and pay per use with zero cost if not used.

This image allows Jenkinsfile execution without needing a persistent Jenkins master running in the same way as Jenkins X Serverless, but using the Google Cloud Run platform instead of Kubernetes.

Google Cloud Run vs Project Fn vs AWS Lambda

I wrote three flavors of Jenkinsfile Runner

The image is similar to the other ones. The main difference between Lambda and Google Cloud Run is in the packaging, as Lambda layers are limited in size and are expanded in /opt while Google Cloud Run allows any custom Dockerfile where you can install whatever you want in a much easier way.

This image is extending the Jenkinsfile Runner image instead of doing a Maven build with it as a dependency as it simplifies classpath magement.

Limitations

Max build duration is 15 minutes but we can use a timeout value up tos 60 minutes by using gcloud beta.

Current implementation limitations:

  • checkout scm does not work, change it to sh 'git clone https://github.com/carlossg/jenkinsfile-runner-example.git'

Example

See the jenkinsfile-runner-example project for an example.

When the PRs are built Jenkins writes a comment back to the PR to show status, as defined in the Jenkinsfile, and totally customizable.

Check the PRs at carlossg/jenkinsfile-runner-example

Extending

You can add your plugins to plugins.txt. You could also add the Configuration as Code plugin for configuration, example at jenkins.yaml.

Other tools can be added to the Dockerfile.

Installation

GitHub webhooks execution will time out if the call takes too long, so we also create a nodejs Google function (index.js) that forwards the request to Google Cloud Run and returns the response to GitHub while the build runs.

Building

Build the package

mvn verify 
docker build -t jenkinsfile-runner-google-cloud-run .

Publishing

Both the function and the Google Cloud Run need to be deployed.

Set GITHUB_TOKEN_JENKINSFILE_RUNNER to a token that allows posting PR comments. A more secure way would be to use Google Cloud Secret Manager.

export GITHUB_TOKEN_JENKINSFILE_RUNNER=... 
PROJECT_ID=$(gcloud config get-value project 2> /dev/null) 
make deploy

Note the function url and use it to create a GitHub webhook of type json.

Execution

To test the Google Cloud Run execution

URL=$(gcloud run services describe jenkinsfile-runner \ 
  --platform managed \ 
  --region us-east1 \ 
  --format 'value(status.address.url)') 

curl -v -H "Content-Type: application/json" ${URL}/handle \
  -d @src/test/resources/github.json

Logging

gcloud logging read \
  "resource.type=cloud_run_revision AND resource.labels.service_name=jenkinsfile-runner" \ 
  --format "value(textPayload)" --limit 100

or

gcloud alpha logging tail \
  "resource.type=cloud_run_revision AND resource.labels.service_name=jenkinsfile-runner" \ 
  --format "value(textPayload)"

GitHub events

Add a GitHub json webhook to your git repo pointing to the Google Cloud Function url than you can get with

gcloud functions describe jenkinsfile-runner-function \
  --format 'value(httpsTrigger.url)'

Testing

The image can be run locally

docker run -ti --rm -p 8080:8080 \
  -e GITHUB_TOKEN=${GITHUB_TOKEN_JENKINSFILE_RUNNER} \
  jenkinsfile-runner-google-cloud-run
curl -v -H "Content-Type: application/json" \
  -X POST http://localhost:8080/handle \
  -d @src/test/resources/github.json

More information in the Jenkinsfile-Runner-Google-Cloud-Run GitHub page.

Deploying Kubernetes Apps into Alibaba Cloud Container Service

alibaba-cloud-logo-898D58C1CE-seeklogo.comAlibaba Cloud has a managed Kubernetes service called Alibaba Cloud Container Service. As with other distributions of Kubernetes there are some quirks to use it. I have documented the issues I’ve found when trying to run Jenkins X there.

Alibaba Cloud has several options to run Kubernetes:

  • Dedicated Kubernetes: You must create three Master nodes and one or multiple Worker nodes for the cluster
  • Managed Kubernetes: You only need to create Worker nodes for the cluster, and Alibaba Cloud Container Service for Kubernetes creates and manages Master nodes for the cluster
  • Multi-AZ Kubernetes
  • Serverless Kubernetes (beta): You are charged for the resources used by container instances. The amount of used resources is measured according to resource usage duration (in seconds).

You can run in multiple regions across the globe, however to run in the mainland China regions you need a Chinese id or business id. When running there you also have to face the issues of running behind The Great Firewall of China, that is currently blocking some Google services, such as Google Container Registry access, where some Docker images are hosted. DockerHub or Google Storage Service are not blocked.

Creating a Kubernetes Cluster

Alibaba requires several things in order to create a Kubernetes cluster, so it is easier to do it through the web UI the first time.

The following services need to be activated: Container Service, Resource Orchestration Service (ROS), RAM, and Auto Scaling service, and created the Container Service roles.

If we want to use the command line we can install the aliyun cli. I have added all the steps needed below in case you want to use it.

brew install aliyun-cli
aliyun configure
REGION=ap-southeast-1

The clusters need to be created in a VPC, so that needs to be created with VSwitches for each zone to be used.

aliyun vpc CreateVpc \
    --VpcName jx \
    --Description "Jenkins X" \
    --RegionId ${REGION} \
    --CidrBlock 172.16.0.0/12

{
    "ResourceGroupId": "rg-acfmv2nomuaaaaa",
    "RequestId": "2E795E99-AD73-4EA7-8BF5-F6F391000000",
    "RouteTableId": "vtb-t4nesimu804j33p4aaaaa",
    "VRouterId": "vrt-t4n2w07mdra52kakaaaaa",
    "VpcId": "vpc-t4nszyte14vie746aaaaa"
}

VPC=vpc-t4nszyte14vie746aaaaa

aliyun vpc CreateVSwitch \
    --VSwitchName jx \
    --VpcId ${VPC} \
    --RegionId ${REGION} \
    --ZoneId ${REGION}a \
    --Description "Jenkins X" \
    --CidrBlock 172.16.0.0/24

{
    "RequestId": "89D9AB1F-B4AB-4B4B-8CAA-F68F84417502",
    "VSwitchId": "vsw-t4n7uxycbwgtg14maaaaa"
}

VSWITCH=vsw-t4n7uxycbwgtg14maaaaa

Next, a keypair (or password) is needed for the cluster instances.

aliyun ecs ImportKeyPair \
    --KeyPairName jx \
    --RegionId ${REGION} \
    --PublicKeyBody "$(cat ~/.ssh/id_rsa.pub)"

The last step is to create the cluster using the just created VPC, VSwitch and Keypair. It’s important to select the option Expose API Server with EIP (public_slb in the API json) to be able to connect to the API from the internet.

echo << EOF > cluster.json
{
    "name": "jx-rocks",
    "cluster_type": "ManagedKubernetes",
    "disable_rollback": true,
    "timeout_mins": 60,
    "region_id": "${REGION}",
    "zoneid": "${REGION}a",
    "snat_entry": true,
    "cloud_monitor_flags": false,
    "public_slb": true,
    "worker_instance_type": "ecs.c4.xlarge",
    "num_of_nodes": 3,
    "worker_system_disk_category": "cloud_efficiency",
    "worker_system_disk_size": 120,
    "worker_instance_charge_type": "PostPaid",
    "vpcid": "${VPC}",
    "vswitchid": "${VSWITCH}",
    "container_cidr": "172.20.0.0/16",
    "service_cidr": "172.21.0.0/20",
    "key_pair": "jx"
}
EOF

aliyun cs  POST /clusters \
    --header "Content-Type=application/json" \
    --body "$(cat create.json)"

{
    "cluster_id": "cb643152f97ae4e44980f6199f298f223",
    "request_id": "0C1E16F8-6A9E-4726-AF6E-A8F37CDDC50C",
    "task_id": "T-5cd93cf5b8ff804bb40000e1",
    "instanceId": "cb643152f97ae4e44980f6199f298f223"
}

CLUSTER=cb643152f97ae4e44980f6199f298f223

We can now download kubectl configuration with

aliyun cs GET /k8s/${CLUSTER}/user_config | jq -r .config > ~/.kube/config-alibaba
export KUBECONFIG=$KUBECONFIG:~/.kube/config-alibaba

Another detail before being able to install applications that use PersistentVolumeClaims is to configure a default storage class. There are several volume options that can be listed with kubectl get storageclass.

NAME                          PROVISIONER     AGE
alicloud-disk-available       alicloud/disk   44h
alicloud-disk-common          alicloud/disk   44h
alicloud-disk-efficiency      alicloud/disk   44h
alicloud-disk-ssd             alicloud/disk   44h

Each of them matches the following cloud disks:

  • alicloud-disk-common: basic cloud disk (minimum size 5GiB). Only available in some zones (us-west-1a, cn-beijing-b,…)
  • alicloud-disk-efficiency: high-efficiency cloud disk, ultra disk (minimum size 20GiB).
  • alicloud-disk-ssd: SSD disk (minimum size 20GiB).
  • alicloud-disk-available: provides highly available options, first attempts to create a high-efficiency cloud disk. If the corresponding AZ’s efficient cloud disk resources are sold out, tries to create an SSD disk. If the SSD is sold out, tries to create a common cloud disk.

To set SSDs as the default:

kubectl patch storageclass alicloud-disk-ssd \
    -p '{"metadata": {"annotations": {"storageclass.kubernetes.io/is-default-class":"true"}}}'

NOTE: Alibaba cloud disks must be more than 5GiB (basic) or 20GiB (SSD and Ultra)) so we will need to configure any service that is deployed with PVCs to have that size as a minimum or the PersistentVolumeprovision will fail.

You can continue reading about installing Jenkins X on Alibaba Cloud as an example.

Jenkins China Tour 2019

jenkins-xJenkins 中国巡演. 你好. The next two weeks I’ll be in China participating in the Continuous Delivery Summit, KubeCon and several Jenkins related events, and giving some talks:

Progressive Delivery: Continuous Delivery the Right Way

Progressive Delivery makes it easier to adopt Continuous Delivery, by deploying new versions to a subset of users and evaluating their correctness and performance before rolling them to the totality of the users, and rolled back if not matching some key metrics. Canary deployments is one of the techniques in Progressive Delivery, used in companies like Facebook to roll out new versions gradually. But good news! you don’t need to be Facebook to take advantage of it.

We will demo how to create a fully automated Progressive Delivery pipeline with Canary deployments and rollbacks in Kubernetes using Jenkins X and Flagger, a project that uses Istio and Prometheus to automate Canary rollouts and rollbacks.


Jenkins X: Next Generation Cloud Native CI/CD

Jenkins X is an open source CI/CD platform for Kubernetes based on Jenkins. It runs on Kubernetes and transparently uses on demand containers to run build agents and jobs, and isolate job execution. It enables CI/CD-as-code using automated deployments of commits and pull requests using Skaffold, Helm and other popular open source tools.

Jenkins X integrates Tekton, a new project created at Google and part of the Continuous Delivery Foundation, for serverless CI/CD pipelines. Jobs run in Kubernetes Pods using containers scaling up as needed, and down, so you don’t pay if no jobs are running.

Progressive Delivery with Jenkins X: Automatic Canary Deployments

jenkins-x

This is the third post in a Progressive Delivery series, see the previous ones:

Progressive Delivery is used by Netflix, Facebook and others to reduce the risk of deployments. But you can now adopt it when using Jenkins X.

Progressive Delivery is the next step after Continuous Delivery, where new versions are deployed to a subset of users and are evaluated in terms of correctness and performance before rolling them to the totality of the users and rolled back if not matching some key metrics.

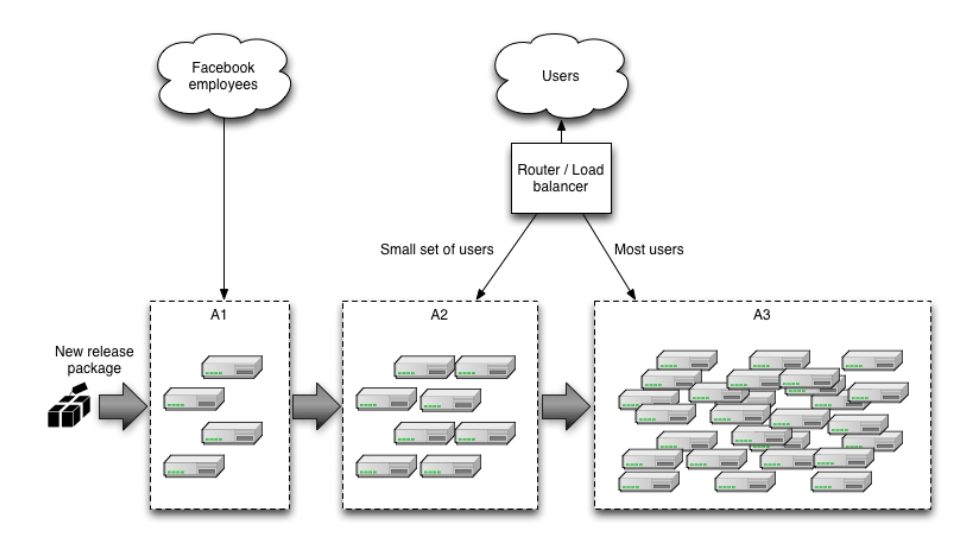
In particular we focused on Canary releases and made it really easy to adopt them in your Jenkins X applications. Canary releases consist on sending a small percentage of traffic to the new version of your application and validate there are no errors before rolling it out to the rest of the users. Facebook does it this way, delivering new versions first to internal employees, then a small percentage of the users, then everybody else, but you don’t need to be Facebook to take advantage of it!

facebook-canary-strategy.jpg

You can read more on Canaries at Martin Fowler’s website.

Jenkins X

If you already have an application in Jenkins X you know that you can promote it to the “production” environment with jx promote myapp --version 1.0 --env production. But it can also be automatically and gradually rolled it out to a percentage of users while checking that the new version is not failing. If that happens the application will be automatically rolled back. No human intervention at all during the process.

NOTE: this new functionality is very recent and a number of these steps will not be needed in the future as they will also be automated by Jenkins X.

As the first step three Jenkins X addons need to be installed:

  • Istio: a service mesh that allows us to manage traffic to our services.
  • Prometheus: the most popular monitoring system in Kubernetes.
  • Flagger: a project that uses Istio to automate canarying and rollbacks using metrics from Prometheus.

The addons can be installed (using a recent version of the jx cli) with

jx create addon istio
jx create addon prometheus
jx create addon flagger

This will enable Istio in the jx-production namespace for metrics gathering.

Now get the ip of the Istio ingress and point a wildcard domain to it (e.g. *.example.com), so we can use it to route multiple services based on host names. The Istio ingress provides the routing capabilities needed for Canary releases (traffic shifting) that the traditional Kubernetes ingress objects do not support.

kubectl -n istio-system get service istio-ingressgateway \
-o jsonpath='{.status.loadBalancer.ingress[0].ip}'

The cluster is configured, and it’s time to configure our application. Add a canary.yaml to your helm chart, under charts/myapp/templates.

{{- if eq .Release.Namespace "jx-production" }}
{{- if .Values.canary.enable }}
apiVersion: flagger.app/v1alpha2
kind: Canary
metadata:
  name: {{ template "fullname" . }}
spec:
  targetRef:
    apiVersion: apps/v1
    kind: Deployment
    name: {{ template "fullname" . }}
  progressDeadlineSeconds: 60
  service:
    port: {{.Values.service.internalPort}}
{{- if .Values.canary.service.gateways }}
    gateways:
{{ toYaml .Values.canary.service.gateways | indent 4 }}
{{- end }}
{{- if .Values.canary.service.hosts }}
    hosts:
{{ toYaml .Values.canary.service.hosts | indent 4 }}
{{- end }}
  canaryAnalysis:
    interval: {{ .Values.canary.canaryAnalysis.interval }}
    threshold: {{ .Values.canary.canaryAnalysis.threshold }}
    maxWeight: {{ .Values.canary.canaryAnalysis.maxWeight }}
    stepWeight: {{ .Values.canary.canaryAnalysis.stepWeight }}
{{- if .Values.canary.canaryAnalysis.metrics }}
    metrics:
{{ toYaml .Values.canary.canaryAnalysis.metrics | indent 4 }}
{{- end }}
{{- end }}
{{- end }}

Then append to the charts/myapp/values.yaml the following, changing myapp.example.com to your host name or names:

canary:
  enable: true
  service:
    # Istio virtual service host names
    hosts:
    - myapp.example.com
    gateways:
    - jx-gateway.istio-system.svc.cluster.local
  canaryAnalysis:
    # schedule interval (default 60s)
    interval: 60s
    # max number of failed metric checks before rollback
    threshold: 5
    # max traffic percentage routed to canary
    # percentage (0-100)
    maxWeight: 50
    # canary increment step
    # percentage (0-100)
    stepWeight: 10
    metrics:
    - name: istio_requests_total
      # minimum req success rate (non 5xx responses)
      # percentage (0-100)
      threshold: 99
      interval: 60s
    - name: istio_request_duration_seconds_bucket
      # maximum req duration P99
      # milliseconds
      threshold: 500
      interval: 60s

Soon, both the canary.yaml and values.yaml changes won’t be needed when you create your app from one of the Jenkins X quickstarts, as they will be Canary enabled by default.

That’s it! Now when the app is promoted to the production environment with jx promote myapp --version 1.0 --env production it will do a Canary rollout. Note that the first time it is promoted it will not do a Canary as it needs a previous version data to compare to, but it will work from the second promotion on.

With the configuration in the values.yaml file above it would look like:

  • minute 1: send 10% of the traffic to the new version
  • minute 2: send 20% of the traffic to the new version
  • minute 3: send 30% of the traffic to the new version
  • minute 4: send 40% of the traffic to the new version
  • minute 5: send 100% of the traffic to the new version

If the metrics we have configured (request duration over 500 milliseconds or more than 1% responses returning 500 errors) fail, Flagger then will note that failure, and if it is repeated 5 times it will rollback the release, sending 100% of the traffic to the old version.

To get the Canary events run

$ kubectl -n jx-production get events --watch \
  --field-selector involvedObject.kind=Canary
LAST SEEN   FIRST SEEN   COUNT   NAME                                                  KIND     SUBOBJECT   TYPE     REASON   SOURCE    MESSAGE
23m         10d          7       jx-production-myapp.1584d8fbf5c306ee   Canary               Normal   Synced   flagger   New revision detected! Scaling up jx-production-myapp.jx-production
22m         10d          8       jx-production-myapp.1584d89a36d2e2f2   Canary               Normal   Synced   flagger   Starting canary analysis for jx-production-myapp.jx-production
22m         10d          8       jx-production-myapp.1584d89a38592636   Canary               Normal   Synced   flagger   Advance jx-production-myapp.jx-production canary weight 10
21m         10d          7       jx-production-myapp.1584d917ed63f6ec   Canary               Normal   Synced   flagger   Advance jx-production-myapp.jx-production canary weight 20
20m         10d          7       jx-production-myapp.1584d925d801faa0   Canary               Normal   Synced   flagger   Advance jx-production-myapp.jx-production canary weight 30
19m         10d          7       jx-production-myapp.1584d933da5f218e   Canary               Normal   Synced   flagger   Advance jx-production-myapp.jx-production canary weight 40
18m         10d          6       jx-production-myapp.1584d941d4cb21e8   Canary               Normal   Synced   flagger   Advance jx-production-myapp.jx-production canary weight 50
18m         10d          6       jx-production-myapp.1584d941d4cbc55b   Canary               Normal   Synced   flagger   Copying jx-production-myapp.jx-production template spec to jx-production-myapp-primary.jx-production
17m         10d          6       jx-production-myapp.1584d94fd1218ebc   Canary               Normal   Synced   flagger   Promotion completed! Scaling down jx-production-myapp.jx-production

Dashboard

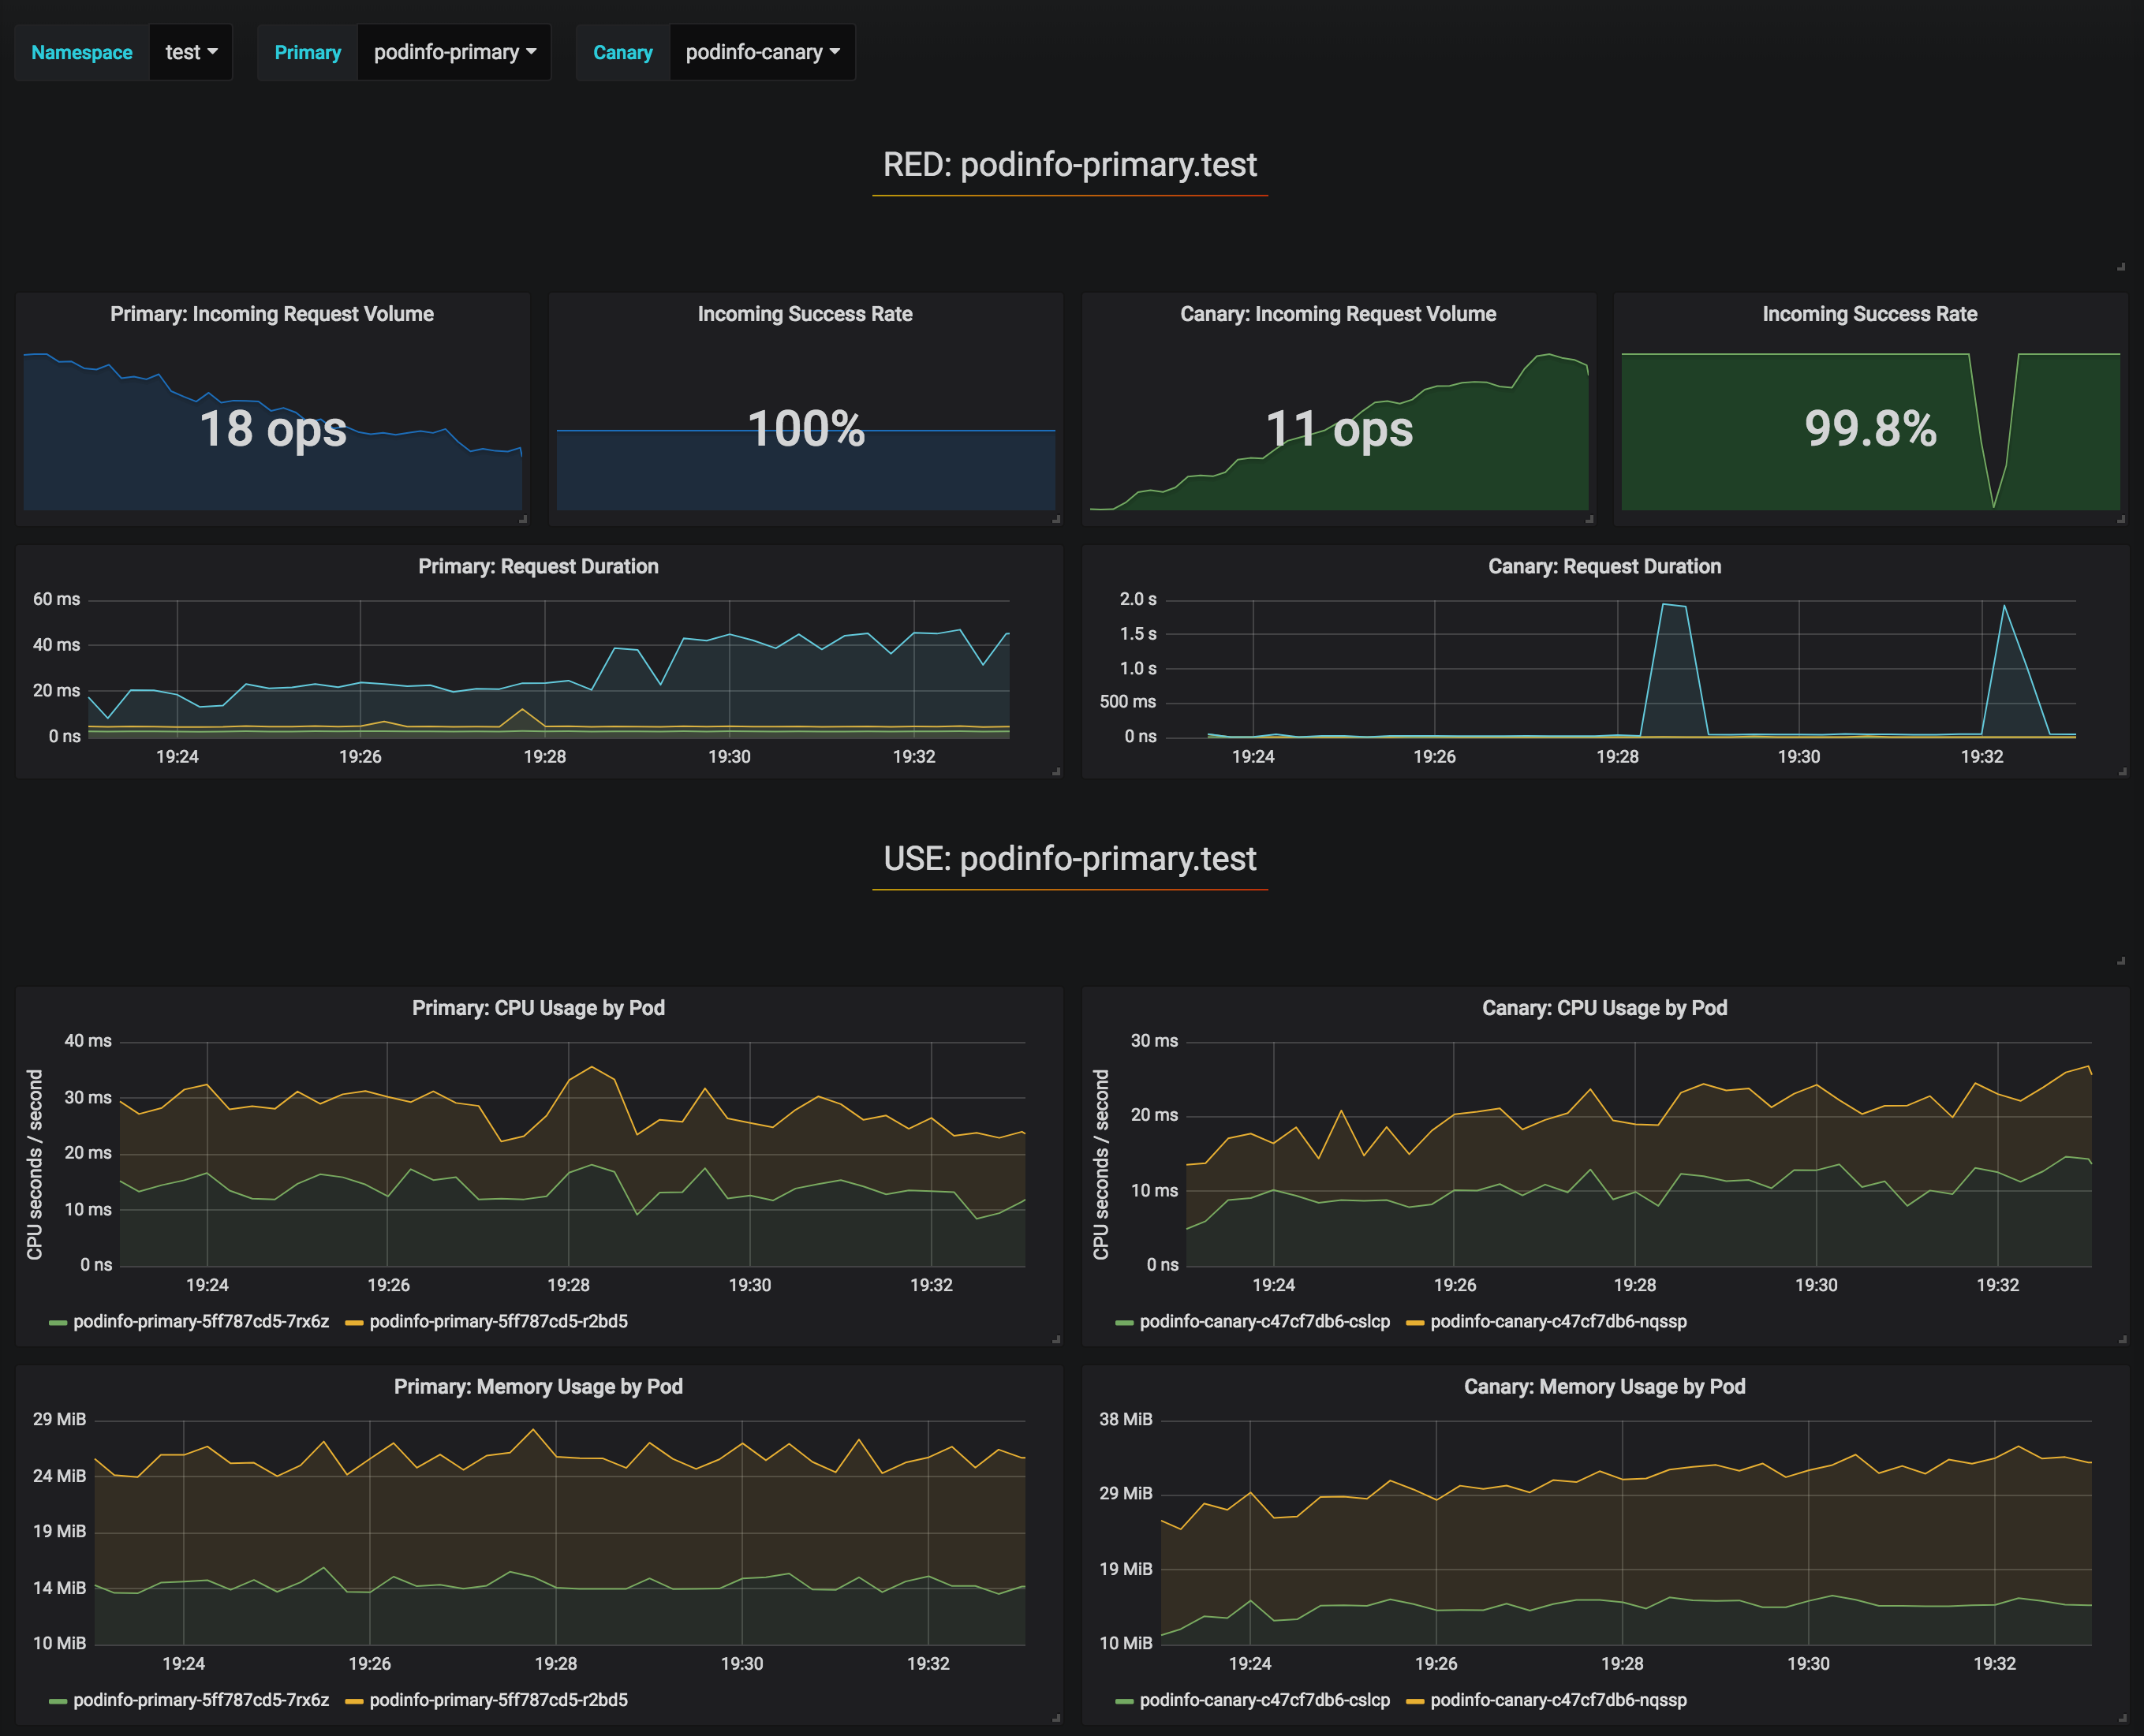
Flagger includes a Grafana dashboard for visualization purposes as it is not needed for the Canary releases. It can be accessed locally using Kubernetes port forwarding

kubectl --namespace istio-system port-forward deploy/flagger-grafana 3000

Then accessing http://localhost:3000 using admin/admin, selecting the canary-analysis dashboard and

  • namespace: jx-production
  • primary: jx-production-myapp-primary
  • canary: jx-production-myapp

would provide us with a view of different metrics (cpu, memory, request duration, response errors,…) of the incumbent and new versions side by side.

Caveats

Note that Istio by default will prevent access from your pods to the outside of the cluster (a behavior that is expected to change in Istio 1.1). Learn how to control the Istio egress traffic.

If a rollback happens automatically because the metrics fail, the Jenkins X GitOps repository for the production environment becomes out of date, still using the new version instead of the old one. This is something planned to be fixed in next releases.

Serverless Jenkins Pipelines with Fn Project

jenkins-lambdaThe Jenkinsfile-Runner-Fn project is a Fn Project (a container native, cloud agnostic serverless platform) function to run Jenkins pipelines. It will process a GitHub webhook, git clone the repository and execute the Jenkinsfile in that git repository. It allows scalability and pay per use with zero cost if not used.

This function allows Jenkinsfile execution without needing a persistent Jenkins master running in the same way as Jenkins X Serverless, but using the Fn Project platform (and supported providers like Oracle Functions) instead of Kubernetes.

Fn Project vs AWS Lambda

The function is very similar to the one in jenkinsfile-runner-lambda with just a small change in the signature. The main difference between Lambda and Fn is in the packaging, as Lambda layers are limited in size and are expanded in /optwhile Fn allows a custom Dockerfile where you can install whatever you want in a much easier way, just need to include the function code and entrypoint from fnproject/fn-java-fdk.

Oracle Functions

Oracle Functions is a cloud service providing Project Fn function execution (currently in limited availability). jenkinsfile-runner-fn function runs in Oracle Functions, with the caveat that it needs a syslog server running somewhere to get the logs (see below).

Limitations

Current implementation limitations:

  • checkout scm does not work, change it to sh 'git clone https://github.com/carlossg/jenkinsfile-runner-fn-example.git'
  • Jenkinsfile must use /tmp for any tool that needs writing files, see the example

Example

See the jenkinsfile-runner-fn-example project for an example that is tested and works.

Extending

You can add your plugins to plugins.txt. You could also add the Configuration as Code plugin for configuration.

Other tools can be added to the Dockerfile.

Installation

Install Fn

Building

Build the function

mvn clean package

Publishing

Create and deploy the function locally

fn create app jenkinsfile-runner
fn --verbose deploy --app jenkinsfile-runner --local

Execution

Invoke the function

cat src/test/resources/github.json | fn invoke jenkinsfile-runner jenkinsfile-runner

Logging

Get the logs for the last execution

fn get logs jenkinsfile-runner jenkinsfile-runner \
$(fn ls calls jenkinsfile-runner jenkinsfile-runner | grep 'ID:' | head -n 1 | sed -e 's/ID: //')

Syslog

Alternatively, start a syslog server to see the logs

docker run -d --rm -it -p 5140:514 --name syslog-ng balabit/syslog-ng:latest
docker exec -ti syslog-ng tail -f /var/log/messages-kv.log

Update the function to send logs to the syslog server

fn update app jenkinsfile-runner --syslog-url tcp://logs-01.loggly.com:514

GitHub events

Add a GitHub json webhook to your git repo pointing to the function url.

More information in the Jenkinsfile-Runner-Fn GitHub page.

Running Jenkins Pipelines in AWS Lambda

jenkins-lambdaThe Jenkinsfile-Runner-Lambda project is a AWS Lambda function to run Jenkins pipelines. It will process a GitHub webhook, git clone the repository and execute the Jenkinsfile in that git repository. It allows huge scalability with 1000+ concurrent builds and pay per use with zero cost if not used.

This function allows Jenkinsfile execution without needing a persistent Jenkins master running in the same way as Jenkins X Serverless, but using AWS Lambda instead of Kubernetes. All the logs are stored in AWS CloudWatch and are easily accessible.

Why???

Why not?

I mean, it could make sense to run Jenkinsfiles in Lambda when you are building AWS related stuff, like creating an artifact and uploading it to S3.

Limitations

Lambda limitations:

  • 15 minutes execution time
  • 3008MB of memory
  • git clone and generated artifacts must fit in the 500MB provided

Current implementation limitations:

  • checkout scm does not work, change it to sh 'git clone https://github.com/carlossg/jenkinsfile-runner-lambda-example.git'
  • Jenkinsfile must add /usr/local/bin to PATH and use /tmp for any tool that needs writing files, see the example

Extending

Three lambda layers are created:

  • jenkinsfile-runner: the main library
  • plugins: minimal set of plugins to build a Jenkinsfile
  • tools: git, openjdk, maven

You can add your plugins in a new layer as a zip file inside a plugins dir to be expanded in /opt/plugins. You could also add the Configuration as Code plugin and configure the Artifact Manager S3 to store all your artifacts in S3.

Other tools can be added as new layers, and they will be expanded in /opt. You can find a list of scripts for inspiration in the lambci project (gcc,go,java,php,python,ruby,rust) and bash, git and zip (git is already included in the tools layer here)

The layers are built with Docker, installing jenkinsfile-runner, tools and plugins under /opt which is where Lambda layers are expanded. These files are then zipped for upload to Lambda.

Installation

Create a lambda function jenkinsfile-runner using Java 8 runtime. Use the layers built in target/layer-* and target/jenkinsfile-runner-lambda-*.jar as function. Could use make publish to create them.

Set

  • handler: org.csanchez.jenkins.lambda.Handler::handleRequest
  • memory: 1024MB
  • timeout: 15 minutes
aws lambda create-function \
    --function-name jenkinsfile-runner \
    --handler org.csanchez.jenkins.lambda.Handler::handleRequest \
    --zip-file fileb://target/jenkinsfile-runner-lambda-1.0-SNAPSHOT.jar \
    --runtime java8 \
    --region us-east-1 \
    --timeout 900 \
    --memory-size 1024 \
    --layers output/layers.json

Exposing the Lambda Function

From the lambda function configuration page add a API Gateway trigger. Select Create a new API and choose the security level. Save the function and you will get a http API endpoint.

Note that to achieve asynchronous execution (GitHub webhooks execution will time out if your webhook takes too long) you would need to configure API Gateway to send the payload to SNS and then lambda to listen to SNS events. See an example.

GitHub events

Add a GitHub json webhook to your git repo pointing to the lambda api gateway url.


More information in the Jenkinsfile-Runner-Lambda GitHub page.

Jenkins Kubernetes Plugin: 2018 in Review

kubernetesLast year has been quite prolific for the Jenkins Kubernetes Plugin, with 55 releases and lots of external contributions!

In 2019 there will be a push for Serverless Jenkins and with that a shift to make agents work better in a Kubernetes environment, with no persistent jnlp connections. You can watch my Jenkins X and Serverless Jenkins demo at Kubecon.

Main changes in the Kubernetes plugin in 2018:

  • Allow creating Pod templates from yaml. This allows setting all possible fields in Kubernetes API using yaml
  • Add yamlFile option for Declarative agent to read yaml definition from a different file
  • Support multiple containers in declarative pipeline
  • Support passing kubeconfig file as credentials using secretFile credentials
  • Show pod logs and events in the Jenkins node page
  • Add optional usage restriction for a Kubernetes cloud using folder properties
  • Add Pod Retention policies to keep pods around on failure
  • Validate label and container names with regex
  • Add option to apply caps only on alive pods
  • Split credentials classes into new plugin kubernetes-credentials

Full Changelog

2018-12-31 kubernetes-1.14.2
2018-12-24 kubernetes-1.14.1
2018-12-19 kubernetes-1.14.0
2018-12-19 kubernetes-1.13.9
2018-12-13 kubernetes-1.13.8
2018-11-30 kubernetes-1.13.7
2018-11-23 kubernetes-1.13.6
2018-10-31 kubernetes-1.13.5
2018-10-30 kubernetes-1.13.4
2018-10-30 kubernetes-1.13.3
2018-10-24 kubernetes-1.13.2
2018-10-23 kubernetes-1.13.1
2018-10-19 kubernetes-1.13.0
2018-10-17 kubernetes-1.12.9
2018-10-17 kubernetes-1.12.8
2018-10-11 kubernetes-1.12.7
2018-09-07 kubernetes-1.12.6
2018-09-07 kubernetes-1.12.5
2018-08-28 kubernetes-1.12.4
2018-08-09 kubernetes-1.12.3
2018-08-07 kubernetes-1.12.2
2018-08-06 kubernetes-1.12.1
2018-07-31 kubernetes-1.12.0
2018-07-31 kubernetes-1.11.0
2018-07-23 kubernetes-1.10.2
2018-07-16 kubernetes-1.10.1
2018-07-11 kubernetes-1.10.0
2018-07-11 kubernetes-1.9.3
2018-06-26 kubernetes-1.9.2
2018-06-26 kubernetes-1.9.1
2018-06-26 kubernetes-1.9.0
2018-06-22 kubernetes-1.8.4
2018-06-22 kubernetes-1.8.3
2018-06-19 kubernetes-1.8.2
2018-06-13 kubernetes-1.8.1
2018-06-13 kubernetes-1.8.0
2018-05-30 kubernetes-1.7.1
2018-05-30 kubernetes-1.7.0
2018-05-29 kubernetes-1.6.4
2018-05-25 kubernetes-1.6.3
2018-05-23 kubernetes-1.6.2
2018-05-22 kubernetes-1.6.1
2018-04-25 kubernetes-1.6.0
2018-04-16 kubernetes-1.5.2
2018-04-09 kubernetes-1.5.1
2018-04-01 kubernetes-1.5
2018-03-28 kubernetes-1.4.1
2018-03-21 kubernetes-1.4
2018-03-16 kubernetes-1.3.3
2018-03-07 kubernetes-1.3.2
2018-02-21 kubernetes-1.3.1
2018-02-21 kubernetes-1.3
2018-02-16 kubernetes-1.2.1
2018-02-02 kubernetes-1.2
2018-01-29 kubernetes-1.1.4
2018-01-10 kubernetes-1.1.3

KubeCon: Jenkins X: Continuous Delivery for Kubernetes

kubelogo-wide

The video of my talk at KubeCon 2018 Seattle

Jenkins X is a new open source CI/CD platform for Kubernetes based on Jenkins.
Jenkins X runs on Kubernetes and transparently uses on demand containers to run build agents and jobs, and isolate job execution. It enables CI/CD-as-code using Jenkins Pipelines and automated deployments of commits and pull requests using Skaffold, Helm and other popular tools. We will demo how to use Jenkins X on any Kubernetes cluster for fully automated CI and CD using a GitOps approach.

JavaZone: Using Kubernetes for Continuous Integration and Continuous Delivery

javazone@2x-luftThe video of my talk at JavaZone 2018

Building and testing is a great use case for containers, both due to the dynamic and isolation aspects. We will share our experience running Jenkins at scale using Kubernetes

Jenkins is an example of an application that can take advantage of Kubernetes technology to run Continuous Integration and Continuous Delivery workloads. Jenkins and Kubernetes can be integrated to transparently use on demand containers to run build agents and jobs, and isolate job execution. It also supports CI/CD-as-code using Jenkins Pipelines and automated deployments to Kubernetes clusters. The presentation and demos will allow a better understanding of how to use Jenkins on Kubernetes for container based, totally dynamic, large scale CI and CD.

Kubernetes Plugin for Jenkins 1.7.1 Security Release

A minor security issue has been found and fixed in 1.7.1

  • Do not print credentials in build output or logs. Only affects certain pipeline steps like withDockerRegistrysh step is not affected

Other interesting new feature is the support of multiple containers in declarative pipeline #306 JENKINS-48135

</pre>
<pre>pipeline {
  agent {
    kubernetes {
      label 'mypod'
      defaultContainer 'jnlp'
      yaml """
apiVersion: v1
kind: Pod
metadata:
  labels:
    some-label: some-label-value
spec:
  containers:
  - name: maven
    image: maven:alpine
    command:
    - cat
    tty: true
  - name: busybox
    image: busybox
    command:
    - cat
    tty: true
"""
    }
  }
  stages {
    stage('Run maven') {
      steps {
        container('maven') {
          sh 'mvn -version'
        }
        container('busybox') {
          sh '/bin/busybox'
        }
      }
    }
  }
}</pre>
<pre>

1.7.1

  • Do not print credentials in build output or logs. Only affects certain pipeline steps like withDockerRegistrysh step is not affected SECURITY-883

1.7.0

  • Add option to apply caps only on alive pods #252
  • Add idleMinutes to pod template in declarative pipeline #336 JENKINS-51569

1.6.4

  • Use Jackson and Apache HttpComponents Client libraries from API plugins #333 JENKINS-51582

1.6.3

1.6.2

  • Transfer any master proxy related envs that the remoting jar uses to the pod templates with addMasterProxyEnvVarsoption #321

1.6.1

  • Some fields are not inherited from parent template (InheritFrom, InstanceCap, SlaveConnectTimeout, IdleMinutes, ActiveDeadlineSeconds, ServiceAccount, CustomWorkspaceVolumeEnabled) #319

1.6.0

  • Support multiple containers in declarative pipeline #306 JENKINS-48135
  • Expose pod configuration via yaml to UI and merge tolerations when inheriting #311
  • Resolve NPE merging yaml when resource requests/limits are not set #310
  • Do not pass arguments to jnlp container #315 JENKINS-50913

1.5.2

1.5.1

You can find the full changelog in GitHub.